Ready to start the first training session with your brand-new Train.Red sensor? As with any other wearable, there are several tips & tricks to obtain as accurate data as possible with minimal noise. This blog was not idealized to be a guide on how to use the Train.Red system but rather to give an overall view of different challenges that might affect your overall experience and data. We will suggest several tips & tricks that will prevent rookie mistakes.
Where should you place the sensor?
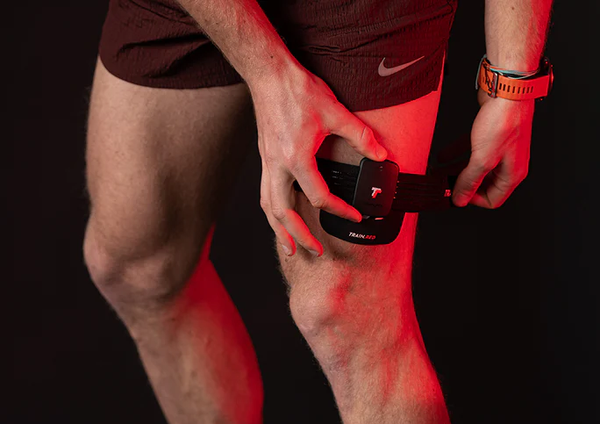
The location of the sensor on your body is highly dependent on the exercise you are doing. It makes sense to position the device on the primarily involved locomotor muscles, but you are of course free to explore other options.
For running or cycling, for example, you will want to place your Train.Red sensor on your leg, and in specific gym exercises such as pull-ups you would focus on the upper body. In this blog post, we will focus on running for the simple reason that it is a movement that is transferable to several other sports activities.
The quadriceps is an important muscle group during running. As the Latin name already suggests, it consists of 4 separate muscles; the m. Rectus Femoris (RF), the m. Vastus Lateralis (VL), m. Vastus Medialis (VM), and m. Vastus Intermedius (VI). The quadriceps are the main muscles responsible for breaking the body mass center during early stance and providing body weight support. Apart from the VI, which is not reachable via your skin surface, all other three could be an option to place your Train.Red sensor over. Even though these three muscles have similar functions during running and NIRS data will be similar, small variances can be noticed. Every individual muscle in the quadricep shares a common tendon that inserts at the patella but they have a different origin and therefore a different function. This is also the reason you will observe regional oxygenation differences if you wear multiple sensors on your upper leg simultaneously!
Assuming that you for example want to control your running pace or purely monitor your rest between series, we recommend placing the sensor over the muscle that feels the most comfortable. When doing internal tests, we typically measure the RF during running.
By extending the knee you will contract your quadriceps and you can feel and maybe even see the RF, VL, and VM. You will acquire the best signal if you place the Train.Red sensor in the middle of the visible muscle you choose, the so-called ‘muscle belly’.

A running gait cycle includes a stance, 60% of the cycle, and a swing phase, 40% cycle. The cycle begins when one foot strikes the ground and finishes when the same foot strikes the ground again. During this sequence, several muscles contribute in a different way in each phase. These differences relate to the biomechanics as well as the speed you are running at. Looking at the Rectus Femoris for example; a fusiform muscle that covers the vertical anterior facet of the thigh. Its origin is at the ilium and insertion at the tibial tuberosity (via the patellar ligament). The main function of the RF is flexion of the hip joint (thigh flexion) and extension of the knee joint (leg flexion). RF has a role throughout the whole running cycle. It is the muscle that has the most effective lever arm to create flexion and is therefore mainly used during the swing phase when your hip is in the mid-outer range of flexion. The RF is also essential immediately after (heel) contact with the ground at the end of each swing phase and the beginning of the stance phase. The muscle avoids hyperextension of the knee joint. Increasing the running speed will increase the load on the RF.
How can you assure and optimize the quality of the data of the Train.Red sensor?
Several factors need to be kept in mind because they can affect the data quality. During road cycling, as long as you are not racing one of the cobble classics, athletes experience almost no ground impact. However, this is not the case when you are running, during running the ground forces increase with an increased velocity. When the sensor is not maintaining the same position during a session, you will see movement artifacts in your data. To prevent the sensor from sliding down, it should be firmly fixated but without becoming tight or uncomfortable. Keep in mind your muscle will grow when warmed up because of the increased blood flow, something you can actively monitor with the Train.Red sensor and use it to your benefit!
The included strap package comes with 3 straps in different sizes, small, medium and large, or 37cm, 54cm, and 69cm. Since the straps are elastic they allow a good fit from 18cm to 80cm in circumference when strapped properly. When strapped extremely tight we managed to go as far as 140cm, but this naturally has an influence on your measurement as well because you will simply occlude your blood flow similar to a tourniquet. The inside of the strap is covered with 4 anti-slip silicone lines that showed to stop the sensor from sliding down when strapped just to lose.
Additionally, the package comes with 20 Train.Red patches. The main purpose of these patches is to intercept ambient light (more on that later) but they can alternatively be used as an additional adhesive. When ground contact forces are high, e.g. during fast sprints or jumps it might be necessary to ensure the sensors stay in place with a patch.
Where should you position the straps?
Muscle shape and size can be a challenge when positioning the Train.Red sensor on your upper leg. If you have very defined or developed muscles it might be that the movement of your limbs overstretches the strap. During every single step your leg muscles will contract and relax, and thus ‘grow’ and ‘shrink’. Combined with the massive force generated by the initial contact of your foot with the ground, this tends to move the sensor. Tying up the strap seems an obvious solution, but keep in mind you do not want to block blood flow. Positioning the the Train.Red sensor and strap a bit higher on your thigh is the first feasible solution, secondly you can use the patches to stick the sensor to your body. Both ways significantly stabilize the positioning of the Train.Red sensor. Naturally, a combination of both the altered placement and the patch is also a secure option.
Protect against sunlight!
Not only your dermatologist will tell you it’s important to protect against sunlight, but so do we! Approximately 54% of the sunlight that reaches the skin is infrared light. We use very specific wavelengths and ambient light filters, but a very tiny part of this 54% is the exact same signal.
For that reason, it is needed to wear the Train.Red patch on very sunny days. The patch is similar to Kinesio tape but improved with several extra layers of dark woven fabric. You wear the patch directly on your skin, and again similar to Kinesio tape you can actually wear it on your body for multiple days. The marked area on the patch shows where to place the receiver side of the sensor.
If you are used to training with sports leggings or compressive shorts, you will not experience a lot of these issues as they might already be solved. Using dark clothing over the Train.Red sensors will block sunlight and improve your data quality, besides they will also help to stabilize the Train.Red sensor.
In short, to optimize the use of your Train.Red Muscle Oxygen Sensor, make sure you place the sensor properly, on a muscle you will be mainly using during that specifique session. Also use the Train.Red straps to maintain the Train.Red sensor in the same location and avoid motion artifacts. Lastly, it is important to protect your sensor against sunlight. This again, will avoid noise in your data.